
Lern how to build wooden fingerboards. Follow the instruction step by step to build your first fingerboard easily. On this page you will find a video instruction as well as detailed picture instructions with text.
Video Instruction
Picture Instruction
Bring wood into shape
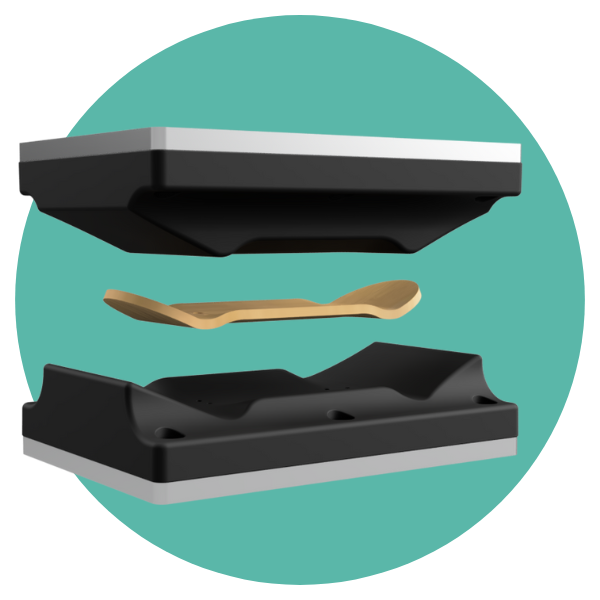
Prepare 5 strips of veneer. Pay attention to the correct order of the grain. The top, middle and bottom layers must have a lengthwise grain, the rest crosswise. Apply wood glue to the veneer (1) and spread it carefully with your finger. Stack the layers of wood in the correct order (2) and place it in the mold (3). Give the glue some time to soak into the wood and wait 3-5 minutes before closing the mold. Screw the mold together step by step using the wing nuts provided (4). To prevent the wood from warping, make sure that the two halves of the mold are screwed together as evenly (parallel) as possible. Also make sure that the metal plates are not bent in any direction. Your fingerboard should now harden in the mold for 12 hours (24 hours is better).
Attention: Too much glue increases drying time. Too little or not evenly applied glue prevents good adhesion. You will know the right amount of glue when a shiny, even and transparent film can be seen on the wood after it has been applied.


The Boardshape
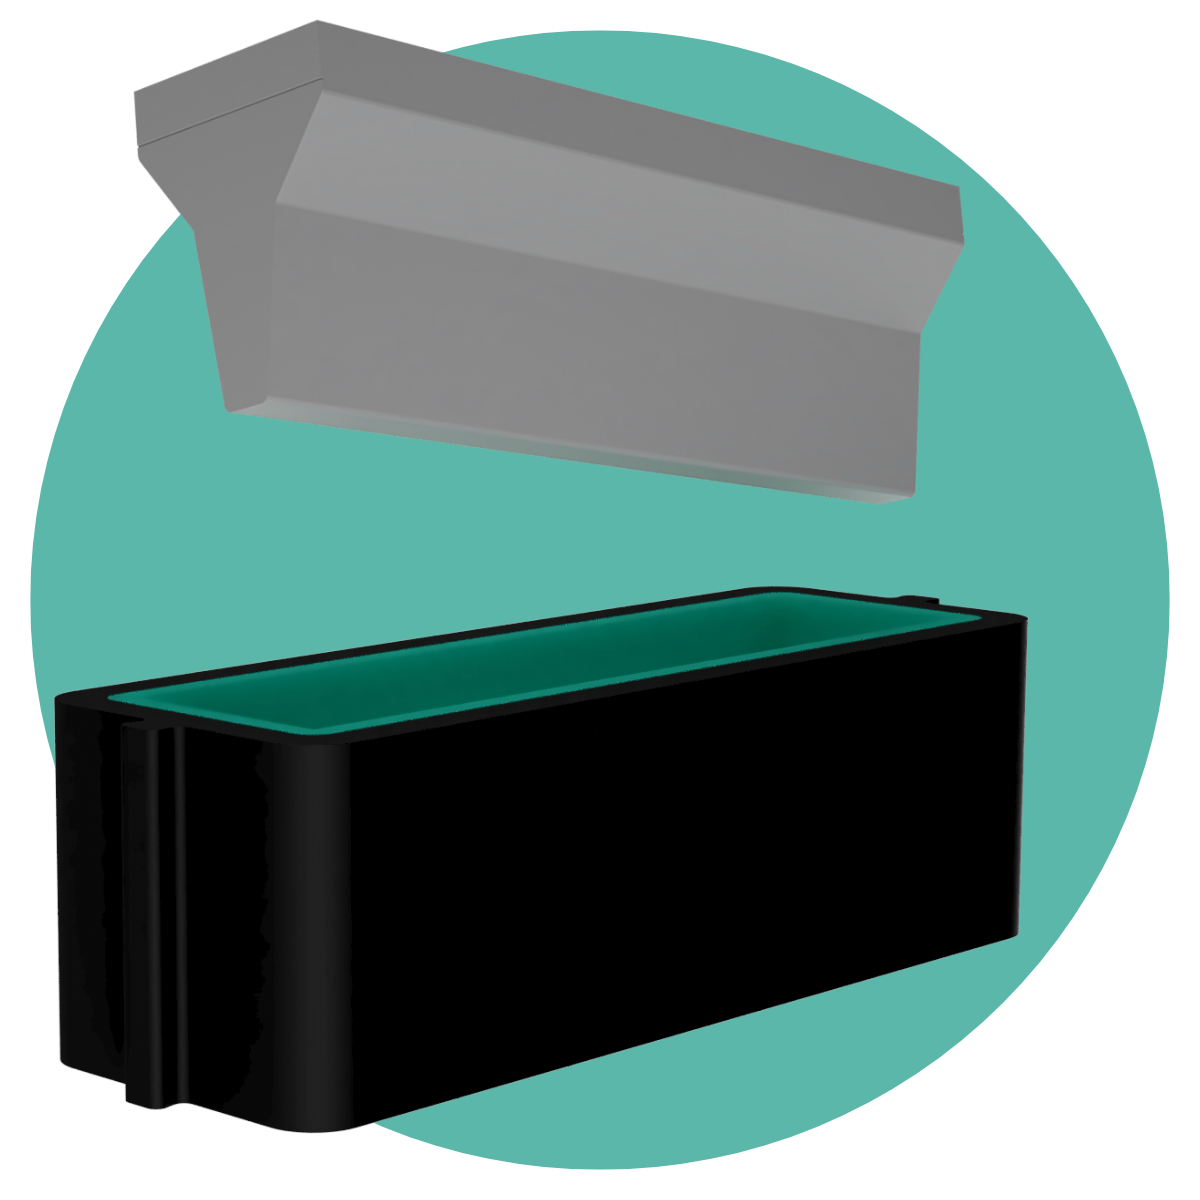
As soon as the glue has hardened, the truck holes are drilled using the drill holes (1). Use a 1.5 or 1.6 mm drill bit for this (for more details click here). Then remove the screws and open the mold to remove the blank (2). Now place the board blank on the shaper and draw the shape of the board with a pencil (3). (4) Next, cut out the board with a fretsaw (If you never worked with a fretsaw click here to learn the basics). Then sand the edges of the board with sandpaper until it is perfect for you (5). To ensure that the truck bolts fit properly, it is advisable to countersink the axle holes from above. Use a 3 mm (1/8 inch) drill or a countersink for this (6).


Boardgraphics
This is an optional step. If you want to apply a graphic, the paper technique described here is the easiest to learn: Apply some glue to the underside of the board and spread it with your fingers (1). Carefully spread the paper graphic onto the board from one side with your fingers (2). Press the graphic evenly onto the curves and over the edges of the board (3). After approx. 5 - 10 minutes, the glue will have dried so that you can remove the excess paper. To do this, carefully smooth along the edges of the board at a 45° angle using sandpaper (4). For particularly realistic boards (with or without graphics), it is advisable to apply 2-3 coats of clear varnish at the end. To do this, you can hang your board outdoors on a piece of wire, for example, and varnish it.


Fingerboard Assembly
As soon as the graphic (or the clear coat) has dried, you can assemble your board. First stick the foam tape (riptape, tape) onto the board (1). You can remove the excess tape by rubbing the edge of the board either with a hard object (e.g. metal ruler) or with sandpaper (2). Next, use the enclosed tool to screw on the trucks (3). The easiest way to do this is to first tighten each individual screw only 1-2 turns. Only when all 4 screws are positioned can you tighten them firmly. Now all you have to do is mount the 4 wheels on the trucks (4) with the nuts provided and your board is ready for your first tricks! (5)


learn your first tricks
If you are new to fingerskating, then you should definitely check out the following tutorial. Here you will learn the basics and first tricks. In the end you won't get a video part from a real professional. We wish you a lot of fun...
(click on the following image to go to the video tutorial)

